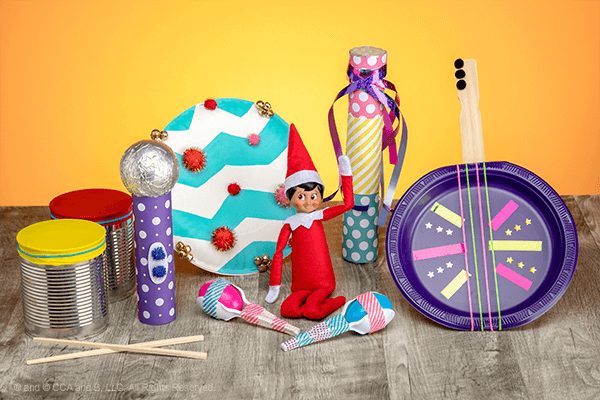
Strum, hum and drum the day away with these rockin’ homemade musical instruments, perfect for an afternoon of fun! Mr. Maestro, a close friend of the Scout Elves as well as the North Pole’s infamous chorus conductor, approves of these easy-to-create instruments that transform common household items into awesome instruments. Gather the family together for an afternoon of crafting, and then, strike up the family band!
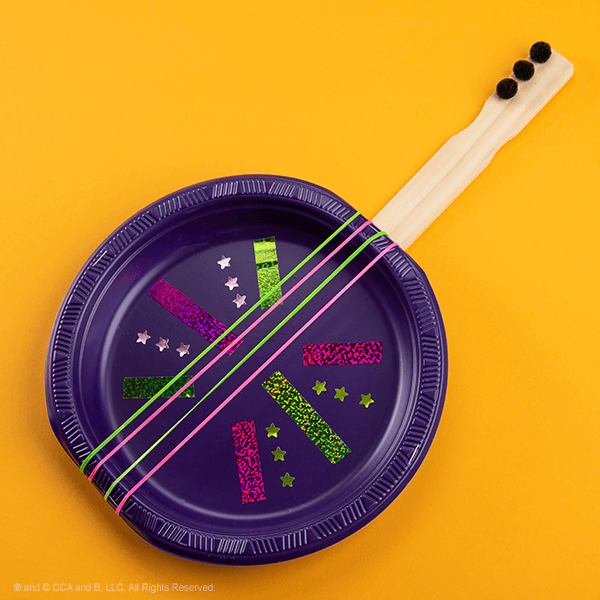
Guitar
Guitar
You’ll Need:
- 1 plastic plate or 2 thick paper plates
- Stapler (if using paper plates)
- Rubber bands
- Paint stick
- Decorations (beads, decorative tape, stickers, paint, etc.)
- Glue
Instructions:
- Staple two paper plates together to create a durable guitar base, or use a plastic plate, and skip to step two.
- Use beads, stickers, paint and more to decorate your guitar and make it unique.
- Stretch rubber bands around the plate to create strings. Parents: Be sure to assist with this step, so the rubber bands don’t break or pop!
- Glue a paint stick to the back of the plate, and add beads or pom poms to the top to mimic pegs.
- Strum away on your new homemade guitar!
Rain Stick
Rain Stick
You’ll Need:
- 1 paper towel roll
- Wrapping paper, scrapbook paper, fabric, etc.
- Glue
- Dry rice or beans
- Heavy duty tape
- Ribbon (optional)
Instructions:
- Use heavy duty tape to cover the opening of one end of the paper towel roll.
- Pour dry rice or beans into the paper towel roll, filling it up as much as you’d like. Helpful hint: Cup your hand over the other end and shake it back and forth to see if you like the sound of your instrument. Continue to add or take away rice or beans until you have the perfect sound.
- Once the sound is exactly how you want it, use heavy duty tape to cover the other opening of the paper towel roll.
- Now for the fun! Decorate your rain stick by gluing wrapping paper, scrapbook paper, fabric or more onto it. Add stickers, glitter or even strands of ribbon to continue to jazz it up.
- Glue strands of ribbon to the top of the rain stick to give this instrument extra flair.
- Turn the rain stick upside down, shaking it back and forth to create a melody.
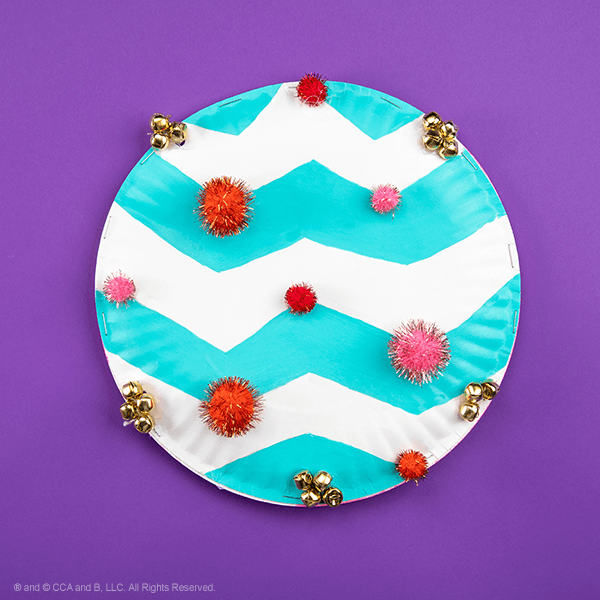
Tambourine
Tambourine
You’ll Need:
- 2 paper plates
- Decorations (paint, stickers, glitter, etc.)
- Hole puncher
- Thin ribbon
- Jingle bells
- Glue or stapler
- Scissors
Instructions:
- Decorate the bottoms of two paper plates any way you’d like. Paint a fun design on them, add stickers or make them sparkle with glitter. Let the plates dry completely.
- Place the two plates together, making sure the decorated sides are facing outward. Use glue or a stapler to secure the plates together, aligning the edges.
- Use a hole puncher to create evenly spaced holes around the edge of the tambourine.
- Cut a short piece of thin ribbon.
- Loop the ribbon through the top of a large jingle bell or through several small jingle bells, and then, loop the bell(s) through one hole. Secure the ribbon by tying it. Repeat steps four and five as many times as necessary to make sure there is a jingle bell(s) looped through each hole.
- Shake, shake, shake your tambourine for an afternoon of musical fun!
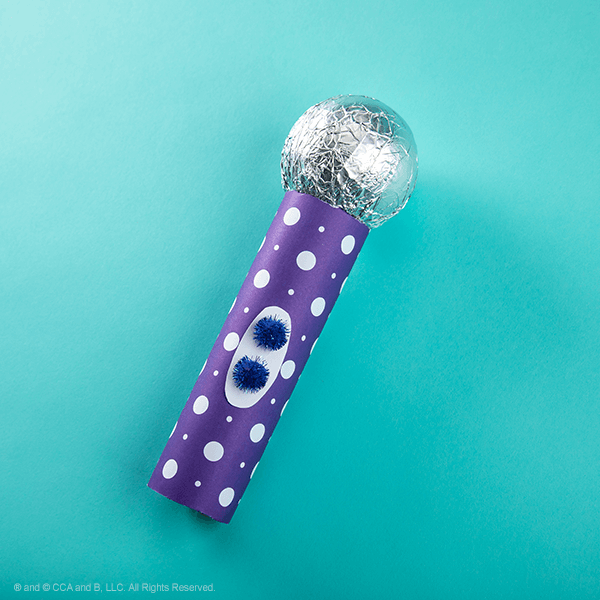
Microphone
Microphone
You’ll Need:
- Paper towel or toilet paper roll
- Any small sphere (Styrofoam ball, plastic ball, etc.)
- Tin foil
- Patterned or colored paper
- Decorations (stickers, sequins, glitter, etc.)
- Scissors
- Glue
Instructions:
- Decide how long you want your microphone handle to be, and then, cut the paper towel roll at the appropriate spot to match this length. For some, a toilet paper roll might be the perfect length to begin.
- Use patterned or colored paper to cover the paper towel roll. Glue the paper onto the roll.
- Decorate your microphone by adding stickers, sequins or even glitter, giving the handle an extra pop of color or sparkle!
- Cover the small sphere with tin foil, making sure it is completely covered and smooth. Helpful hint: If you have an extra sparkly silver plastic Christmas ornament, you could use this instead.
- Apply glue to the top rim of your handle, and place the ball on top. Make sure to hold it in place until it is completely secured by the glue.
- Use your microphone to show off your singing skills during your next karaoke night!
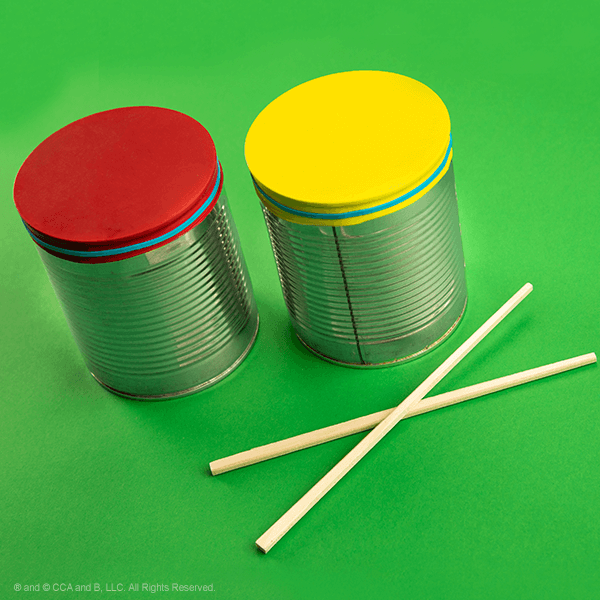
Drums
Drums
You’ll Need:
- 2 empty tin cans
- Dry rice or beans
- 2 balloons
- Scissors
- Rubber bands
- Small sticks (Helpful hint: Chopsticks work great)
Instructions:
- Fill two empty tin cans with a small handful of dry rice or beans.
- Cut the edge off two balloons, any colors of your choice, and stretch them over each can. Helpful hint: Depending on the size of the cans you choose, you may need smaller or larger balloons.
- Secure the balloons in place using rubber bands.
- Start mastering your drum rolls! You can also use small sticks or chopsticks to play along the edges of the cans, creating a different sound!
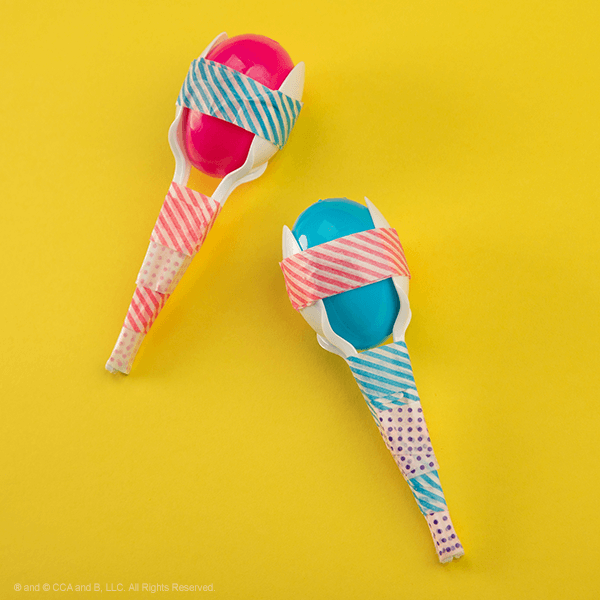
Maracas
Maracas
You’ll Need:
- 4 plastic spoons
- 2 plastic eggs
- Dry rice or beans
- Decorative tape
Instructions:
- Fill each plastic egg with dry rice or beans.
- Place two spoons together, facing the heads of the spoons toward each other.
- Wrap decorative tape around the handles of the spoons to keep the spoons attached.
- Repeat steps 2 and 3 twice to create two maracas.
- Carefully slide a filled egg into the spoons, and wrap decorative tap around the seam several times securing the egg in place. Repeat this step once more to create your second maraca.
- Get shakin’!
Once you’ve created your homemade musical instruments, use them during a karaoke night. Check out The Elf on the Shelf® Karaoke Challenge!
Please remember that when attempting the crafts included in this post children should always be supervised by an adult. When using crafting supplies or products, always read manufacturer’s instructions and warnings.