Bring a touch of Christmas spirit to your Halloween festivities with these adorable DIY costumes designed by the Scout Elves! Kids can choose to dress up as one of Santa’s red-suited helpers, a special North Pole pet, or even iconic symbols of Christmas by using the Scout Elves’ handy instructions. Easy enough to serve as a last-minute costume and clever enough to win any costume competition, these Christmas-y costumes are the perfect choice this Halloween!
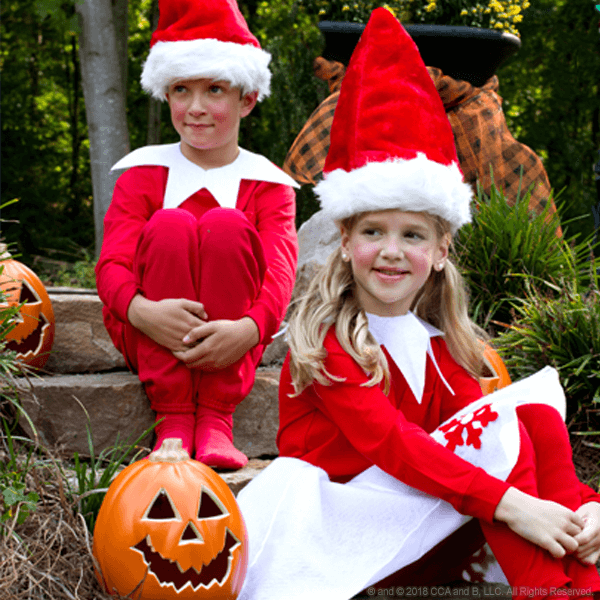
Scout Elf Costume
Scout Elf Costume
You’ll Need:
- ½ yard of white felt
- Elf collar pattern
- Scissors
- Fabric glue
- Adhesive hook and loop fasteners
- Red pants and shirt of your choice
- Santa hat
- White gloves
Instructions:
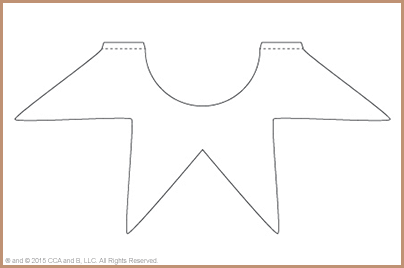
- FOLD the piece of white felt in half, and place the pattern piece on top of it, making sure that “SIDE A” is on the felt’s fold. Cut out the felt in the shape of the pattern.
- REPEAT step one, so you have two pieces that look like this:
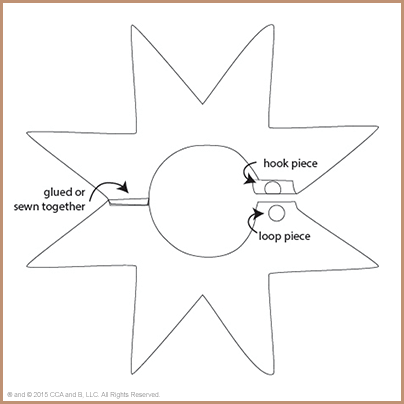
- Using fabric glue, ATTACH one side of the two pieces together, as displayed in the diagram shown below step four.
- PLACE the adhesive hook and loop fasteners on the other side. Check the diagram below to make sure you get the placement of the hook and loop fasteners just right! One of the fastener pieces should be on the underside of one piece of the felt, and the other fastener should be on the top of the other piece of felt.
- HELP your child put on a red shirt, pants, Santa hat, white gloves and the crafty collar you created to complete this authentic Scout Elf look. Now, just like a real Scout Elf, your little ones are ready to snack on all the yummy treats they collect while trick-or-treating!

Christmas Costumes
Christmas Costumes
You’ll Need:
Candy Cane
- Foam core
- Glue
- Red paper
- White paper
- Green paper
- Two elastic strips
- Scissors
- Staple gun
Christmas Tree
- Foam core
- Glue
- Green paper
- Gold/yellow paper
- Red paper
- Purple paper
- One elastic strip
- Scissors
- Staple gun
Instructions:
Candy Cane
- CUT a piece of foam core in the shape of a candy cane.
- USE glue to attach strips of white and red paper to the foam core. Helpful hint: You could also use felt to create a more durable costume.
- CUT a piece of foam core shaped like a bow, and cover it in green paper or fabric. Attach it. Helpful hint: You could also buy an oversized Christmas bow.
- On the back of the costume, STAPLE two elastic strips (near the wearer’s shoulders and lower back) to help keep the costume on.
Christmas Tree
- CUT a piece of foam core in the shape of a Christmas tree.
- USE glue to cover the foam core in green paper. Helpful hint: You could also use felt instead of paper to create a more durable costume.
- ATTACH strips of paper for garland and paper circle cutouts for ornaments. Add a paper star to the top of the costume.
- On the back of the costume, STAPLE one elastic strip (near the middle of the wearer’s back) to help keep the costume on.

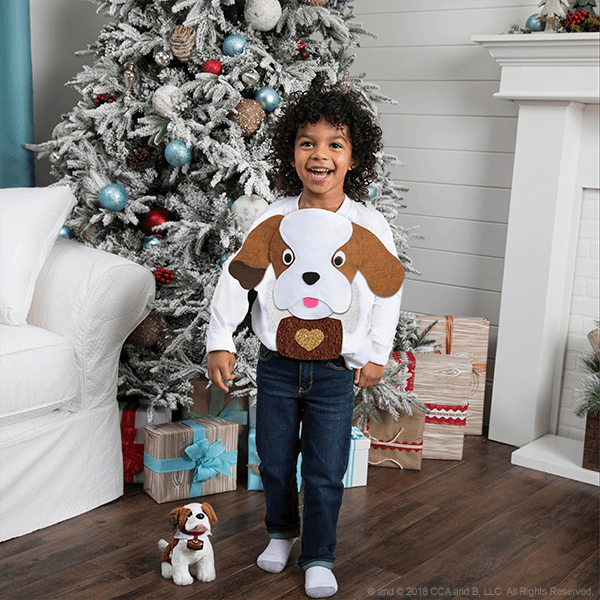
St. Bernard Costume
St. Bernard Costume
You’ll Need:
- Brown felt (in light and dark shades)
- White sweatshirt
- White felt
- Black felt
- Pink felt
- Yellow felt
- Hot glue gun
Instructions:
- CUT out a circle of light brown felt to serve as the base piece for the Saint Bernard’s face.
- Next, CUT out a circle of white felt approximately the same width as the circle of brown felt. However, make the white felt circle approximately three inches taller.
- Using the photo as a guide, TRIM the circle of white felt into an hourglass shape with rounded edges.
- GLUE the white piece of felt on top of the brown piece of felt.
- After it dries, MAKE one final semi-circle cut at the bottom of the white felt. Helpful hint: Keep the piece you cut whole, so it can be used for the next step.
- TAKE the semi-circle of white felt you cut in step number five, and flip it upside down. Use hot glue to reattach it to the same spot it was located, creating the pup’s chin.
- CREATE ears for the puppy by cutting two pieces of brown felt in a slightly curvy, rectangular shape with rounded ends. Use the picture as a reference. Attach the ears to the back of the original piece of brown felt.
- To make your pup look just like the Elf Pets® Saint Bernard, CUT a piece of dark brown felt to go on the lower end of the pup’s right ear.
- To create the eyes, CUT a small oval of white felt. Helpful hint: It should fit in the space where the white felt (shaped like an hourglass) slopes inward.
- Next, CUT a slightly smaller oval of brown felt and an even smaller oval of black felt to place on top of the white felt.
- GLUE all three pieces together, and then, glue the back of the white felt to the original base piece of brown felt.
- CUT out a small triangular nose in black felt and a pink felt tongue (shaped like a capital D). Use the hot glue gun to attach them to the Saint Bernard’s face.
- Once the face of the Saint Bernard is complete, GLUE it to the front of a white sweatshirt.
- As a finishing touch, GLUE a piece of brown felt shaped like the Elf Pets® Saint Bernard’s iconic barrel just under the Saint Bernard’s chin—and don’t forget to glue a yellow heart charm on top!
Need more costume inspiration? Pull together easy, last-minute costumes with items from around the house!
Please remember that when attempting the crafts included in this printable children should always be supervised by an adult. When using craft¬ing supplies or products, always read manufacturer’s instructions and warnings.